
Having spoken to Charlie Anderson from resin manufacturer Monocure about causes of warping of large parts at the plate, I’d like to suggest (on his behalf) adding the option to vary the exposure times of the first several layers. One cause of warping of parts at the plate is due to the large change in exposure times (~30-50 seconds) for the first few layers to relatively short exposure times of around 7-10 seconds for the rest of the print. The change in time also equates to a change in temperature of the exposed layer which can cause warping. By introducing the ability to vary the exposure times for the first few layers, for example to stagger them from 50 seconds to 40 seconds to 30 seconds to 20 seconds to the normal exposure time of 10 seconds would help greatly by reducing warping or distortions near the plate. This sort of option is available in regular slicing software like Simplify 3D where you add set points for temperature to reduce large changes in temperature from the initial layer.
Variable exposure times for the first few layers
I realize that this answer is probably too late to be useful for you, but it might help someone in the future. You can already sort of do it, albeit in a very hacky way.
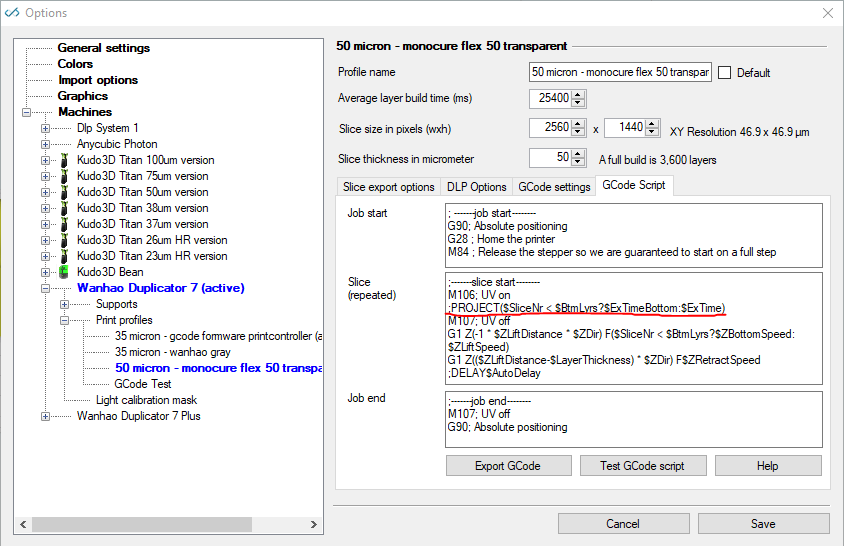
Open File > Configuration > expand Machines > expand the machine profile you use > expand Print Profiles > open the printing profile you would like to try this with > open the GCode Script tab. Have a look at the highlighted line in the textbox. Your profile should have a similar line:
It says
;PROJECT($SliceNr < $BtmLyrs?$ExTimeBottom:$ExTime)
The important part is
$SliceNr < $BtmLyrs?$ExTimeBottom:$ExTime
Here it checks whether the currently printing slice number ($SliceNr) is smaller than the configured number of bottom layers ($BtmLayrs). If that’s the case it projects the image for $ExTimeBottom milliseconds (the bottom exposure time). If not, it will expose the layer for the normal exposure time in milliseconds ($ExTime). Click the help button you can see in the lower right to get more information. As a side-note: The first layer gets $SliceNr 0, the next one gets 1 and so on.
So for example, if you have 2 bottom layers configured with 20 seconds exposure time and then 10 seconds for the rest of the layers. If you replace the variables in the line above with their actual values you get this:
$SliceNr < 2?20000:10000
$SliceNr changes with each layer, of course. The GCode would come out like this:
;PROJECT20000
;PROJECT20000
;PROJECT10000
;PROJECT10000
;PROJECT10000
So to get to the point, you can nest these conditions. Take the following line of code:
$SliceNr < 10 ?($SliceNr < 5?30000:20000):10000
What the code does is this: It checks whether the current slice number $SliceNr is smaller than 10. If that’s not the case (i.e. upwards from, and including, slice 10), it skips the bold part and comes out as 10000. So from layer 10 on it will expose for 10 seconds. But for layers smaller than 10 the bold part is executed:
($SliceNr < 5?30000:20000)
That’s again just a check for the current slice number. If it’s smaller than 5 the layer time will be 30000, but if it’s 5 or above it comes out as 20000. So if we generate test gcode it will come out as something like this:
;PROJECT30000
;PROJECT30000
;PROJECT30000
;PROJECT30000
;PROJECT30000
Layer 6 begins. $SliceNr has a value of 5, so $SliceNr < 5 is no longer true and it comes out as 20000
;PROJECT20000
;PROJECT20000
;PROJECT20000
;PROJECT20000
;PROJECT20000
Layer 11 begins. $SliceNr has a value of 10, so $SliceNr < 10 is no longer true and it comes out as 10000
;PROJECT10000
;PROJECT10000
…
If you create your own expression, watch out for any spaces between PROJECT and the time. You can test your GCode with the “Export GCode” button. So, what if you wanted more granular settings? Well, you can go for as many of those nested expressions as you’d like. For example, to have 5 different setpoints you could use the following GCode:
;PROJECT($SliceNr < 100?($SliceNr < 75?($SliceNr < 50?($SliceNr<25?50000:40000):30000):20000):10000)
This gets you:
- 0-24: 50.000ms
- 25-49: 40.000ms
- 50-74: 30.000ms
- 75-99: 20,000ms
- above layer 100: 10,000ms
This solution has a little problem though: Replacing the existing line of GCode with mine will render the Number of bottom layers, Bottom exposure and Exposure time settings in the configuration dialog useless and may mess with print time estimations. To get around this (not sure how the print time is calculated. Does anyone from the team mind chiming in?) you could use the variables and do something like the following:
;PROJECT($SliceNr < $BtmLyrs?($SliceNr < ($BtmLyrs/2)?$ExTimeBottom:(($ExTimeBottom-$ExTime)/2)+$ExTime):$ExTime)
With the settings 10 bottom layers at 20.000ms and the rest at 10.000ms this will do:
- First 5 layers at 20.000ms
- Next 5 layers at 15.000ms (right in the middle of the two exposure times)
- All the others at 10.000ms
You could of course expand on this and create even more setpoints. Wow, this has turned out way longer than originally intended - I hope it is of some use to someone.
Thanks D353rt that’s exactly the sort of thing I was thinking of albeit in a more user friendly interface. I will give it a go. I think it’s time I learn Gcode!
Hi,
D353rt, thanks for your extensive answer.
The script functionality is basically C# code. It is compiled at runtime with a little trick.
The requirement is that it all has to be in 1 line for the parser to read and compile it.
Another idea i have it that you could enter more lines with PROJECT
I just checked the code and i think it should work.
Of course you are going to flash your image multiple times; but it might be easier to write in code.
In example:
;PROJECT($SliceNr < 1 ?(10000:0))
;PROJECT($SliceNr < 2 ?(10000:0))
;PROJECT($SliceNr < 3 ?(10000:0))
;PROJECT($SliceNr < 4 ?(10000:0))
;PROJECT$ExTime
So what happens here is that the first 4 layers get exposure times like this:
40000+ ExTime
30000+ ExTime
20000+ ExTime
10000 + ExTime
kind regards,
Elco
Hi Elco,
Would there be any delay between each of the exposures? Another issue discussed with Charlie at Monocure was the heat generated by the longer base layer exposures may contribute to prints not sticking to the plate (or more accurately sticking too much to the bottom of the vat). By letting the layer cool down a little before lifting the plate may also help with this. So a side effect of a pause between each of those exposures might be improved plate adhesion.
Kind Regards,
Chris
Hi Chris,
I think you could even push this further by inserting some DELAY commands:
;DELAY1000
will delay the next layer for 1000 ms.
But more handy maybe:
;DELAY($SliceNr < 4 ?(1000:0))
This will give you 1000ms delay between each of the exposures but only the first 4 layers…
I didn’t try it; but i see no reason why it wouldn’t work.
The printcontroller just handles the lines after each other.
Elco
This is interesting and similar to an idea I had to help control warping. I’m fairly new to resin printing but pretty experienced with FDM printing. I use Simplify3D for FDM prints which I really like since it offers a lot of control. One of the the things that Simplify3D does is allow you to in effect create different regions to apply different settings to. The same concept could be applied here, so that you could say layers 1-8 could be 50 seconds, layers 9-100 could be 10 seconds, and layers 101-108 could be 50 seconds again. Putting aside for the moment that this example isn’t necessarily optimum to control warping, the idea is that you could sandwich “soft” layers between “hard” layers. Once removed from the plate, the hard layers could help maintain the form during post print curing. As a workaround what I have been doing for thin prints that tend to warp is just increase the bottom layer count to a high number so that all of the layers are treated as bottom layers (long exposure). This adds a lot of print time. BTW I have noticed that the estimated print times do not take the bottom layer count into consideration properly. When I set the bottom layer count high, the print time is way off. I am new to this forum so I don’t know if this discussion has been had or if the time estimate “bug” is a known bug. I’d call it a bug since it’s obvious that it’s not taking the bottom layer count into consideration properly. Thanks! I will continue to browse the forum.
I’m using the Moai 130 and 200. Is there any way to change the exposure times for the first 30 layers other than editing the code?
Hi JP,
So currently there is only bottom layers and normal layers exposure.
I’m currently implementing the ‘transition layers’ feature. That will add a linear gradient in exposure times between bottom and normal layers.
I will also add that implementation to the speed variable in the SLA output. So it will go gradually.
Expect it end of the week latest.
Hi,
Just want to make sure you implement the ‘transition layers’ feature an option to toggle on or off, or make it machine dependent.
The Anycubic Photon Mono X (pwmx) already implements transition layers (in firmware?), possibly several other more modern printers do this in a similar way as well. On a print profile with 6 bottom layers the first 6 layers are always printed with full bottom layer exposure, but it’s not until layer 16 that I get the first layer with normal layer exposure time. In between it is a linear transition.
/ES
yes, it will be a toggle.
@Erisan, you have a photon mono x? I got a report today that the .pwmx in the latest format is not working on the machine. Not sure if there are also different firmware types there already. I updated the format a little according to UV tools but not sure that works on all firmware types…
Elco
Hi,
@Elco yes I have a photon mono x. Seems to be running fine with .pwmx files sliced with Formware 1.0.4.0, but I have not tried with any of the new stuff like adaptive layer thickness. Only thing I recently changed in my profiles was the Z lift and retract speeds that changed position in 1.0.4.0.
Not sure if there are different printer firmware or hardware types, my printer has firmware 3.5.4 and has been running this a few months.
/ES